This is a repost of the original article that was posted as an embedded PDF file.
Douglas M. Wiig
April 8, 2018
Abstract
This article is part of my series of articles exploring the use of R
packages that allow for visualization of complex relationships among variables.
Other articles have examined visual representations produced by
the qgraph package in both large and small samples with more than three
variables. In this article I look specifically at the R qgraph package with a small
dataset of N=10, but a large number (14) of variables. Specifically, the R
qgraph.pca function is examined.
1 The Problem
In two previous blog posts I discussed some techniques for visualizing relationships
involving two or three variables and a large number of cases. In this
tutorial I will extend that discussion to show some techniques that can be used
on datasets with complex multivariate relationships involving three or more
variables.
In this post I will use a dataset called ‘Detroit.’ This data set was originally
used in the book ‘Subset selection in regression’ by Alan J. Miller published in
the Chapman and Hall series of monographs on Statistics and Applied Probability,
no. 40. It was also used in other research and appeared in appendix A
of ‘Regression analysis and its application: A data-oriented approach’ by Gunst
and Mason, Statistics textbooks and monographs no. 24, Marcel Dekker. Editor.
The Detroit dataset contains 14 variables and 10 cases. Each case represents
a year during the time period 1961-1973. The variables on which data was
collected are seen as possible predictors of homicide rate in Detroit during each
of the years studied.
These data are shown below
FTP UEMP MAN LIC GR CLEAR WM NMAN GOV HE WE HOM ACC ASR
260.35 11.0 455.5 178.15 215.98 93.4 558724. 538.1 133.9 2.98 117.18 8.60 9.17 306.18
269.80 7.0 480.2 156.41 180.48 88.5 538584. 547.6 137.6 3.09 134.02 8.90 40.27 315.16
272.04 5.2 506.1 198.02 209.57 94.4 519171. 562.8 143.6 3.23 141.68 8.52 45.31 277.53
272.96 4.3 535.8 222.10 231.67 92.0 500457. 591.0 150.3 3.33 147.98 8.89 49.51 234.07
272.51 3.5 576.0 301.92 297.65 91.0 482418. 626.1 164.3 3.46 159.85 13.0 55.05 30.84
261.34 3.2 601.7 391.22 367.62 87.4 465029. 659.8 179.5 3.60 157.19 14.57 53.90 17.99
268.89 4.1 577.3 665.56 616.54 88.3 448267. 686.2 187.5 3.73 155.29 21.36 50.62 86.11
295.99 3.9 596.9 1131.21 1029.75 86.1 432109. 699.6 195.4 2.91 131.75 28.03 51.47 91.59
319.87 3.6 613.5 837.60 786.23 79.0 416533. 729.9 210.3 4.25 178.74 31.49 49.16 20.39
341.43 7.1 569.3 794.90 713.77 73.9 401518. 757.8 223.8 4.47 178.30 37.39 45.80 23.03
The variables are as follows:
FTP – Full-time police per 100,000 population
UEMP – % unemployed in the population
MAN – number of manufacturing workers in thousands
LIC – Number of handgun licenses per 100,000 population
GR – Number of handgun registrations per 100,000 population
CLEAR – % homicides cleared by arrests
WM – Number of white males in the population
NMAN – Number of non-manufacturing workers in thousands
GOV – Number of government workers in thousands
HE – Average hourly earnings
WE – Average weekly earnings
HOM – Number of homicides per 100,000 of population
ACC – Death rate in accidents per 100,000 population
ASR – Number of assaults per 100,000 population
[J.C. Fisher ”Homicide in Detroit: The Role of Firearms”, Criminology, vol.14,
387-400 (1976)]
2 Analysis
As I have noted in previous tutorials, social science research projects often start
out with many potential independent predictor variables for a given dependent
variable. If these are all measured at the interval or ratio level, a correlation
matrix often serves as a starting point to begin analyzing relationships among
variables. In this particular case a researcher might be interested in looking at
factors that are related to total homicides. There are many R techniques to
enter data for analysis. In this case I entered the data into an Excel spreadsheet
and then loaded the file into the R environment. Install and load the following
packages:
Hmisc
stats
qgraph
readxl (only needed if importing data from Excel)
A correlation matrix can be generated using the cor function which is contained
in the stats package. To produce a matrix using all 14 variables use the
following code:
#the data file has been loaded as ’detroit’
#the file has 14 columns
#run a pearson correlation and #run a pearson correlation and put into the object ’detcor’
detcor=cor(as.matrix(detroit[c(1:14)]), method=”pearson”)
#
#round the correlation matrix to 2 decimal places for better viewing
round(detcor, 2)
#
#The resulting matrix will be displayed on the screen
Examination of the matrix shows a number of the predictors correlate with the
dependent variable ’HOM.’ There are also a large number of inter-correlations
among the predictor variables. This fact makes it difficult to make any generalizations
based on the correlation matrix only. As demonstrated in previous
tutorials, the qgraph function can be used to produce a visual representation of
the correlation matrix. Use the following code:
#basic graph with 14 vars zero order correlations
qgraph(detcor, shape=”circle”, posCol=”darkgreen”, negCol=”darkred”, layout=”spring”)
This will produce graph as seen below:
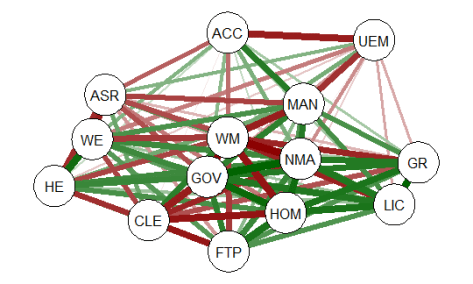
The graph displays positive correlations among variable as a green line, and
negative as a red line. The color intensity indicates the relative strength of the
correlation. While this approach provides an improvement over the raw matrix
it still rather difficult to interpret. There are many options other than those
used in the above example that allow qgraph to have a great deal of flexibility in
creating visual representation of complex relationships among variables. In the
next section I will examine one of these options that uses principal component
analysis of the data.
2.1 Using qgraph Principal Component Analysis
A discussion of the theory behind principal component exploratory analysis is
beyond the scope of this discussion. Suffice it to say that it allows for simplification
of a large number of inter-correlations by identifying factors or dimensions
that individual correlations relate to. This grouping of variables on specific factors
allows qgraph to create a visual representation of these relationships. An
excellent discussion of the theory of PCA along with R scripts can be found in
Principal Components Analysis (PCA), Steven M. Holland Department of Geology,
University of Georgia, Athens, GA, 2008.
To produce a graph using the ’detcor’ correlation matrix used above use the
following code:
#correlation matrix used is ’detcor’
#qgraph with loadings from principal components
#basic options used; many other options available
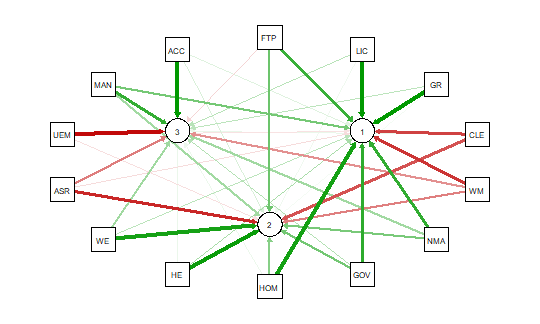
qgraph.pca(detcor, factor=3, rotation=”varimax”)
#this will yield 3 factors
This code produces the output shown below:
As noted above the red and green arrows indicate negative and positive loadings
on the factors, and the color intensity indicates the strength. The qgraph.pca
function produces a useful visual interpretation of the clustering of variables relative
to the three factors extracted. This would be very difficult if not impossible
with only the correlation matrix or the basic qgraph visual representation.
In a future tutorial I will explore more qgraph options that can be used to
explore the Detroit dataset as well as options for a larger datasets. In future
articles I will also explore other R packages that are also useful for analyzing
large numbers of complex variable interrelationships in very large, medium, and
small samples.
** When developing R code I strongly recommend using an IDE such as
RStudio. This is a powerful coding environment and is free for personal use as
well as being open source software. RStudio will run on a variety of platforms.
If you are developing code for future publication or sharing I would also recommend
TeXstudio, a LaTex based document development environment which is also free for personal use. This document was produced using TeXstudio 2.12.6
and RStudio 1.0.136.
