Category Archives: Raspberrypi Computing

Take Your R Projects on the Road: Using R on Your Raspberry Pi, Android Device, and iPhone


I continue to complete work on my next post on using the R wordcloud package.  As I normally do programming and wrting with my Lenovo desktop computer, I decided to experiment with installing R-base and RStudio on my Raspberry Pi Model 3B and tablet computer for those occasions when I desire to work while traveling.    The Raspberry Pi is running the latest version of Debian Trixie along with the Raspberry Pi desktop. The tablet is using the latest version of Android 16. My first observation relates to the availability of R for these platforms.

I. Installing R-base and RStudio on Raspberry Pi3/B,4,5

R is available for a variety of UNIX, Windows, and MacOS systems. If you are running R on Windows, you are familiar with the 32- and 64-bit versions available for download and installation via an executable loader. While the R-base console has been available for the RPi platform, it has only been recently that the RStudio-server has been available for the ARM64 processor used in the RPi 3A/B, 4, and 5 models. I am currently using Debian Trixie 64-bit on my RPi 3/B. The R-base package is now available in Debian repositories so R can be installed via the RPi desktop menu rather than downloading binary builds or executable files.

For an RPi 3B or higher I would recommend the following:
-Make sure your microSD card is large enough. I am using a 32 GB card.
-Make sure your OS is up to date. Use the command line utility to run the following commands:
       sudo apt update (respond to prompts that follow)
       sudo apt full-upgrade (respond the prompts)
Depending on the model of RPi you are using, the memory card size and Debian version you are using this update could take quite some time.

Once the update is completed use the desktop menu to access the add/delete software option, search for the R package using r-base as the keyword and click on the appropriate icon to start the installation. When the installation is complete you should see the R icon in the desktop dropdown menu under the Programming or Science (or both) headings. The R-base console can now be run by clicking the menu icon, and R is now available for access by RStudio-server if it is installed.

Because the RPi uses an ARM processor, RStudio itself cannot be installed, but RStudio-server has been successfully ported to the platform. Additional information on R downloads can be found at the Posit web site RStudio IDE User Guide RStudio User Guide, and at the link RStudio Latest Builds. If you wish to install the RStudio-server from your RPi command line utility there are several steps, but the result is a working web-based interface with full RStudio-server build. Follow the steps listed below.
1. When installing new software run an update using:
     sudo apt update
2. The port of RStudio-server we are installing was designed for the Ubuntu OS so install dependencies needed for Debian using:
     sudo apt install gdebi-core libssl-dev libclang-dev
3. Get the build from the Posit Daily Builds library using 

wget https://dl.dailies.rstudio.com/server/jammy/arm64/rstudio-       server-2026.06.0-242-arm64.deb
4. Install the application using:
 sudo gdebi rstudio-server-2026.06.0-242-arm64.deb
5. When the installation is complete use the system service command to start RStudio-server with:
     sudo systemctl start rstudio-server (for the current  bootup)                                             and/or
     sudo systemctl enable rstudio-server (start at all bootups)
6. Open the Chromium or Firefox web browser from the desktop menu and access the RStudio-server by entering the URL:
      http://<RPi IP address on your network>:8787
In my case I would enter http://192.168.4.115:8787
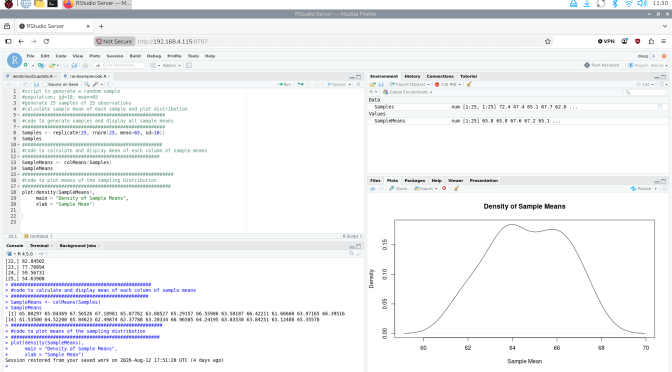
The screenshot shown below shows RStudio with the code from this article and the resulting output.

<Screenshot can be viewed in the PDF version of this document>

II. Using R on an Android Device

R and RStudio will not port directly to an Android based OS, but there are a few applications that will work with varying degrees of utility. I have a tablet that runs Android 16 and am using a free application, Rlytic,. Once installed from the Play Store users sign up with a username and password. When the program starts, a code entry console is displayed. Your code can be entered directly using the on-screen keyboard provided or can be loaded from your device file storage or cloud storage. The interface is easy to use. I have included a simple program example and some screenshots below.
Rlytic is free to use but is restricted to having only 2 programs active at a time. An unlimited version is available for purchase. I might also add that at the time of this writing Rlytic is running on R-base v.3 so users may run into some problems with more complex projects.

III. Using R on an iPhone

I currently use an iPhone 12 and was curious about any R applications that would work with it. I found an application called WebR which combines R-base 4.xxx with a text editor and browser interface. According to the program s author the application was designed for use by students in a classroom setting when learning statistics and/or R programming. It provides a highly mobile platform for Running R programs and quickly generates both text and graphics output. Once again, I will leave it to readers to engage the application s learning curve and will provide a simple example and screenshots below. The software is free and is available in the iPhone App Store.

IV. Sample Program: Raspberry Pi

The following code is a simple example of how R can be used to demonstrate the Central Limit Theorem in sampling from a population. The code uses the R-base rnorm function to generate randomly selected samples from a normally distributed population of values with a given population mean and standard deviation, finds the mean of each sample generated and graphs the sampling distribution. The code is shown below.

#population; sd=10; mean=65
#generate 25 samples of 25 observations
#calculate sample mean of each sample and plot distribution
###################################################
#code to generate samples and display all sample means
###################################################
Samples <- replicate(25, rnorm(25, mean=65, sd=10))
Samples #show the samples generated
##################################################
#code to calculate and display mean of each column of sample means
#################################################
SampleMeans <- colMeans(Samples)
SampleMeans #show the means of the samples generated
####################################################
#code to plot means of the sampling distribution
#####################################################
plot(density(SampleMeans),
main = “Density of Sample Means”,
xlab = “Sample Mean”)
The plot of the distribution of the sample means is shown below.

<Screenshot can be viewed in the PDF version of this document>

V. Sample Program: Rlytic
Here is the same code with the plot of the results for the Rlytic app on my Android 16 tablet. For brevity I have not included all the hashtag dialog from the RPi example. The screenshot and plot are shown.
#population; sd=10; mean=65
#generate 25 samples of 25 observations
#calculate sample mean of each sample and plot distribution
Samples <- replicate(25, rnorm(25, mean=65, sd=10))
#Samples
SampleMeans <- colMeans(Samples)
#SampleMeans
plot(density(SampleMeans),
main = “Density”,
xlab = Mean”)
The Rlytic Screen:

<Screenshot can be viewed in the PDF version of this document>

The Rlytic Plot: (Note Rlytic graphs are PDF format)

<Screenshot can be viewed in the PDF version of this document>

VI. Sample Program: WebR for iPhone
Here is a slightly modified version of the random sampling code entered into WebR on my iPhone 12.
x=rnorm(25, mean=65, sd=10)
plot(density(x))
Shown below is the resulting output. As in previous examples I did not print the output showing the randomly generated individual means.

<Screenshot can be viewed in the PDF version of this document>

I am still working on the next part of my tutorial on using wordcloud and related packages for the analysis of large, complex text files. Please look for my next post in the not-too-distant future.
D.M. Wiig
R Statistics and Programming
https://dmwiig.net

How to Set Up SSH to Remotely Control Your Raspberry Pi


Connecting your RPi to the outside world: how to connect remotely via the web

A tutorial by D.M. Wiig

Once you have your RPi server up and running there are a few things that you may want to consider if
you are planning to host content to be delivered over the web. Assuming you have successfully connected your
RPi to the outside world, you can save some processing over head by disconnecting the monitor, keyboard and mouse.
You can access your RPi via the web from another computer using the ssh function for Linux systems and a program such
as PuTTY for Windows systems.

To use access your RPi remotely you must first make sure that ssh is enabled on your Pi. You can do this by opening
a terminal on the Pi and issuing the command:


$pi@raspberrypi / $ sudo raspi-config

This will invoke the Raspberry Pi Software Configuation Tool. Select option #8, Advanced Options, and then option

A4 SSH Enable/Disable remote command line access to your Pi using SSH

press enter and take the Enable option from the next menu.

If ssh has not been enabled previously reboot your Pi so that the option will be enabled. You should now be able to access your Pi remotely from any computer connected to the web.

If you are using a linux based computer open a terminal program. The following screen shot shows a typical sequence of commands will access your Pi via the web:
—————————-
doug@doug-Satellite-M55:~$ ssh http://www.raspberrypiandr.net -l pi
pi@www.raspberrypiandr.net’s password:
Linux raspberrypi 3.10.25+ #622 PREEMPT Fri Jan 3 18:41:00 GMT 2014 armv6l

The programs included with the Debian GNU/Linux system are free software;
the exact distribution terms for each program are described in the
individual files in /usr/share/doc/*/copyright.

Debian GNU/Linux comes with ABSOLUTELY NO WARRANTY, to the extent
permitted by applicable law.
Last login: Tue Mar 25 21:08:54 2014 from 71-34-171-204.desm.qwest.net
pi@raspberrypi ~ $
——————————–
Substitute your URL after the ssh command. After the -l option use whatever you named your Pi when you initially set it up.
You will asked for a password and should then be logged in and see a command line prompt.

If you are using a Windows based computer system you can one of several free programs that will allow you to remotely access your RPi. One of the most popular is called PuTTY. This program can be downloaded from the web site http://www.putty.org. Once you are sure your
remote connect works correctly you can unplug the monitor, keyboard, and mouse from your Pi, leaving just the power connection and whatever type of internet connection you are using. This will help to cut some of the load from your Pi as it functions serving web pages. To end
your remote session simply type ‘logout’ at the command line and you should see something similar to:

——————————–
pi@raspberrypi ~ $ logout
Connection to http://www.raspberrypiandr.net closed.
doug@doug-Satellite-M55:~$
——————————–

You can now close your terminal program until your next remote session.


How to Install PHP-APC On Your Raspberry PI to speed up your Apache Server


How to Install PHP-APC on your RPi to speed up your Apache Server

A Tutorial by D.M. Wiig

In a previous tutorial I discuss how to install a LAMP stack on your RPi and set it up as a web server. I have been hosting this WordPress site on my RPi now for serveral months. It has been running quietly and with low power drain 24/7 with virtually no down time. I have a fair amount of content on the site and it has been averaging around 50 or more visits per day since I got it up and running.

While the RPi is not going to have the speed of a professional grade server it does a credible job in applications where the load is reasonable and spread out evenly over the day. There are numerous tips and tricks to fine tune the Apache server that runs in the LAMP stack. One of the most effective and quickest tuneups is to install the program PHP-APC which is an alternative caching program for PHP files. WordPress serves up its content dynamically using PHP so having an efficient caching system for PHP will speed up serving content.

To install PHP-APC on an RPi running the Debian Wheezy Raspian OS open a terminal screen and issue the following command from the command prompt:

pi@raspberrypi / $ sudo apt-get install php-apc
The application will download and install. When the install is complete locate the file “20-apc.ini” The file should be installed in the /etc/php5/conf.d directory. Open the file in the nano editor with the commands:


pi@raspberrypi / $ cd /etc/php5/conf.d
pi@raspberrypi /etc/php5/conf.d $ sudo nano 20-apc.ini
The file will open in the editor and should see the following lines:
———————————————————————-
GNU nano 2.2.6 File: 20-apc.ini

extension=apc.so
apc.enabled=1
apc.shm_size=12M
apachectl restart
———————————————————————-

Change the setting apc.sh_size=12M to a larger size such as 20M or so to start. Depending on your needs the size of the cache can be expanded as needed. Press Ctrl-o to save the file and Ctrl-x to exit back to the command prompt. Restart the server with the command:

pi@raspberrypi / $ sudo  apachectl restart

Your Apache server should now be up and running with a larger and faster cache. I do not have any benchmarks to cite, but my WordPress application seems to respond noticeably faster with the apc cache installed. There are many other methods to fine tune your RPi as a web server including installing several alternatives to the Apache server. These are the subject of future tutorials.


How To: Install a fast efficient web server on your Raspberry Pi


How To: Install a fast efficient web server on your Raspberry Pi

A tutorial by D.M. Wiig

In a previous tutorial I discussed setting up your RPi as a web server using a standard LAMP stack configuration. I have been using my RPi with this installation self-hosting a WordPress web site and have had very good success. For situations where a heavy load or memory intensive applications are anticipated the standard LAMP stack may not be sufficient. The Apache server and MySql database used in the configuration work well but the RPi is memory limited and may not effectively handle heavy loads.

In these kinds of environments it may be worthwhile to set up your RPi with faster and more memory efficient software. The nginx server (pronounced ‘engine x’) is designed to be fast and memory efficient and is an easy installation on an RPi running a Debian Wheezy Raspian OS. The first part of this turorial will guide you throught the basic setup and initial configuration of nginx on your RPi.

To get started it is a good idea to make sure that all of your installed software is running the most current versions. Open a terminal program and issue the command:

$ sudo apt-get update

When the update is completed issue the following command to install the nginx server:

$ sudo apt-get install nginx

This command will download and install the nginx server and all dependencies needed for the server to run. By default the server is installed in the directory /etc/nginx, so issue the following commands to get to the directory:

$ cd /etc/nginx
$ dir

You should see the output shown below:

pi@raspberrypi /etc/nginx $ dir
conf.d koi-utf mime.types naxsi.rules proxy_params sites-available uwsgi_params
fastcgi_params koi-win naxsi_core.rules nginx.conf scgi_params sites-enabled win-utf
pi@raspberrypi /etc/nginx $

We have several options at this point, but we will stay with the default configuration found in the ‘sites-enables’directory. Issue the commands:

$ cd sites-enabled
$ dir

You should see the following:

pi@raspberrypi /etc/nginx $ cd sites-enabled
pi@raspberrypi /etc/nginx/sites-enabled $ dir
default
pi@raspberrypi /etc/nginx/sites-enabled $

We will make a couple of changes to the default configuration file using the nano editor. Make sure you give yourself ‘super user’ privileges by using:

$ sudo nano default

You will see the entire configuation file in the editor but we are only interested for now in the following section:

##

server {
listen 80; ## listen for ipv4; this line is default and implied
#listen [::]:80 default_server ipv6only=on; ## listen for ipv6

root /usr/share/nginx/www;
index index.html index.htm;

# Make site accessible from http://localhost/
server_name localhost;

Uncomment the ‘listen 80’ line if it is commented (with a #) out. Do the same for the ‘server_name’ line if it is commented out.
Exit the editor by using Ctrl-O to write the file, and then Ctrl-X to exit the file. We can create a test file to test the server by editing the default index page. To access the page issue the command:

$ cd /usr/share/nginx/www
$ dir

You will see:

pi@raspberrypi /etc/nginx/sites-enabled $ cd /usr/share/nginx/www
pi@raspberrypi /usr/share/nginx/www $ dir
50x.html index.html

To edit the index.html file invoke the editor with:

$ sudo nano index.html

You should see:

GNU nano 2.2.6 File: index.html

<html>
<head>
<title>Welcome to nginx!</title>
</head>
<body bgcolor=”white” text=”black”>
<center><h1>Welcome to nginx!</h1></center>

</body>
</html>

[ Read 9 lines ]
^G Get Help ^O WriteOut ^R Read File ^Y Prev Page ^K Cut Text ^C Cur Pos
^X Exit ^J Justify ^W Where Is ^V Next Page ^U UnCut Text ^T To Spell
Let’s modify the file by inserting the line ‘This is some basic HTML markup to serve!’. After the </head> tag insert the following line:

<br><center><h2>This is some basic HTML to serve!</h2></center>

Your file should look like this:

GNU nano 2.2.6 File: index.html

<html>
<head>
<title>Welcome to nginx!</title>
</head>
<body bgcolor=”white” text=”black”>
<center><h1>Welcome to nginx!</h1></center>
<br><center><h2>This is some basic HTML to serve!</h2></center>
</body>
</html>

[ Read 9 lines ]
^G Get Help ^O WriteOut ^R Read File ^Y Prev Page ^K Cut Text ^C Cur Pos
^X Exit

Exit the editor with the Ctrl-O, Ctrl-X commands.

At this point we can start the server service and check to make sure that nginx is up and running properly. Start the server with:

pi@raspberrypi /usr/share/nginx/www $ sudo service nginx start
Starting nginx: nginx.

To check the server open a web browser and enter the URL http://localhost. You should see index page message displayed. If you have access to another computer on the same network as your RPi you can check the server by entering the local URL in the browser. You should see the default index page greeting. At this point your RPi can serve basic HTML markup to any server on the local network. In the next tutorial I will discuss how to set up and configure PHP and MySql for use with your nginx server setup.


How To: Installing an FTP server on your Raspberry Pi


How To: Installing an FTP server on your Raspberry Pi

(Author: D.M. Wiig. Your comments and questions are welcomed.)

If you are running any of the Linux distributions on your Rpi it is a fairly simple process to install a basic FTP server. There are a number of very good FTP servers available for Linux with vsftpd being one of the most popular. This tutorial will discuss the specifics of a vsftpd server installation. The process would be very similar for other popular FTP servers.

For the sake of simplicity this tutorial will only cover the basic installation of vsftpd for anonymous mode. This means that any user can access the ftp server and download files without a login procedure. By default vsftpd is configured to allow anonymous access and download only. A future tutorial will discuss the setting of options for authentication mode and other client services.

To install vsftpd login to your Rpi and at the command prompt enter:

$ sudo apt-get install vsftpd

When the installation is complete you will see the line:

Starting FTP server: vsftpd

By default a directory for ftp users is created with a home directory of /srv/ftp. This is the default ftp directory. You can check to make sure the ftp server is up and running properly by doing the following:

From the command line issue the command:

$ cd /srv/ftp

Once you are in the ftp directory create a test file by using the following commands:

$ sudo nano ftpsamplefile

Nano is a fast and simple text editor for Raspian. When opened you will get a blank screen. Type in something like:

This is a sample file file loaded in the default ftp directory

/srv/ftp

4/1/14

After you have entered the text hit press Ctrl-o to save the file you have created and then Ctrl-x to exit nano after the line has been saved. Enter the following command in your Rpi to determine the local address of the Rpi:

sudo ifconfig

You will see a number of lines of information. One of the top lines should contain something like:

inet addr:192.xxx.x.xx

This sequence of numbers is the local network address of your Rpi. You can ftp to it from any device on your network, but at this point you are not connected to the outside world so you cannot connect to it from outside of your router and network without some additional steps. To test your installation, open a web browser on any device that you have connected to the same network as your Rpi and enter:

ftp://192.xxx.x.xx (substitute your address found with the ifconfig command for the x’s)

You should see the ftp user directory that will look something like the example below:

Index of /

Name

Size

Date Modified

ftpsamplefile

69 B

3/31/13 8:05:00 PM

The ftp folder will contain the sample file that you created previously. By clicking on the file you should see the contents:

This is a sample ftp file loaded in the directory

/srv/ftp

Your FTP server is now up and running. I will cover issues such as file upload and download as well as creating user authentication and login procedures in another ‘How To:’


How To Connect Your Raspberry Pi Server to the Outside World


How To Connect Your Raspberry Pi Server to the Outside World

A tutorial by D.M. W


Once you have your server set up and running you need to make some changes to your home network to allow the Pi to connect to the outside world. A typical home network consists of an Web connection to a router through which local devices are connected. You can usually connect to your router by using your browser to connect to http://192.168.0.1 or something similar. This is the local address of the router and will give you a number of menu options for changing router settings and getting router information.

All devices connected to the router will have addresses that are similar to 192.xxx.x.xx. You can determine the local address of your Pi by looking at the ‘Device Table’ information in your router or by opening up a command line terminal interface and entering the command:

pi@raspberrypi ~ $ sudo ifconfig

eth0 Link encap:Ethernet HWaddr b8:27:eb:be:3f:bd

inet addr:192.168.0.27 Bcast:192.168.0.255 Mask:255.255.255.0

UP BROADCAST RUNNING MULTICAST MTU:1500 Metric:1

RX packets:15804 errors:0 dropped:0 overruns:0 frame:0

TX packets:5686 errors:0 dropped:0 overruns:0 carrier:0

collisions:0 txqueuelen:1000

RX bytes:1205858 (1.1 MiB) TX bytes:2103034 (2.0 MiB)

lo Link encap:Local Loopback

inet addr:127.0.0.1 Mask:255.0.0.0

UP LOOPBACK RUNNING MTU:65536 Metric:1

RX packets:356 errors:0 dropped:0 overruns:0 frame:0

TX packets:356 errors:0 dropped:0 overruns:0 carrier:0

collisions:0 txqueuelen:0

RX bytes:27968 (27.3 KiB) TX bytes:27968 (27.3 KiB)

I have added the highlighting to show the local address of my Pi. Yours should be similar. Normally all devices connected to the local network can send input and output to the web through the router but are behind a firewall and cannot be accessed directly from the web. In order to use your Pi as a server you need to provide a path through the firewall so that it can be accessed from the web. This is done on most routers by using the ‘Port Forwarding’ feature that is available. Most servers including the Pi ‘listen’ for connect requests on port 80. You can use the port forwarding setting on you router to connect the local address of your Pi to port 80 on the router. On my router the table looks like this:

Connection Status:

CenturyLink®Broadband

2272/864 Kbps

ISP Status:

Port ForwardingEnter ports or port ranges required to forward Internet applications to a LAN device below.

1. Enter the LAN port and IP information.

  Starting Port:

  Ending Port:

  Protocol:

  LAN IP Address:

2. Enter the remote port and IP information. (Optional)

  Starting Port:

  Ending Port:

  Remote IP Address:

 Use 0.0.0.0 for any IP Address

3. Click “Apply” to save your settings.


Port Forwarding List


LAN Ports

Protocol

LAN IP
Address

Remote Ports

Remote IP
Address

Edit

80 – 80

TCP

192.168.0.27

N/A

N/A

21 – 21

TCP

192.168.0.27

N/A

N/A

22 – 22

TCP

192.168.0.27

N/A

N/A

As you can see I have several ports connected to the Pi. Port 21 is commonly used for FTP access and port 22 for ssh access. These are topics for future postings.

Please not that the 198.xxx.x.xx address is a local address and not the address that your router uses to connect to your ISP. The ISP address can be found in the router general information and status tables. If your Pi is set up correctly you should be able to connect to the Pi server from any device connected to the internet by enteringthe URL http://xxx.xx.xx.x (your router’s ISP web address) in a browser. You should see the default apache web page:

It works!

This is the default web page for this server.

The web server software is running but no content has been added, yet.

More to Come: