Tag Archives: r programming

Using R in Nonparametric Statistical Analysis, The Kruskal-Wallis Test Part Three: Post Hoc Pairwise Multiple Comparison Analysis of Ranked Means


Using the Kruskal-Wallis Test, Part Three:  Post Hoc Pairwise Multiple Comparison Analysis of Ranked Means

A tutorial by Douglas M. Wiig

In previous tutorials I discussed an example of entering data into a data frame and performing a nonparametric Kruskal-Wallis test to determine if there were differences in the authoritarian scores of three different groups of educators. The test statistic indicated that at least one of the groups(group 1) was significantly different from the other two.

In order to explore the difference further it common practice to do post hoc analysis of the differences. There are a number of methods that have been devised to do these comparisons, but one of the most straightforward and easiest to understand is pairwise comparison of ranked means(or means if using standard ANOVA.)

Prior to entering the code for this section be sure that the following packages are installed and loaded:

       PMCMR

   prirmess

In part one data was entered into the R editor to create a data frame. Data frames can also be created directly using R script. The script to create the data frame for this example uses the following code:

#create data frame from script input

>Group <- c(1,1,1,1,1,2,2,2,2,2,3,3,3,3)

>authscore <-c(96,128,83,61,101,82,121,132,135,109,115,149,166,147)

>kruskal <- data.frame(Group, authscore)

The group identifiers are entered and assigned to the variable Group, and the authority scores are assigned to the variable authscore. Notice that each identifier is matched with an appropriate authscore just as they were when entered in columns using the data editor. The vectors are then assigned to the variable kruskal to create a data.frame. Once again the structure of the data frame can be checked using the command:

>str(kruskal)

resulting in:

'data.frame':   14 obs. of  2 variables:
 $ Group    : num  1 1 1 1 1 2 2 2 2 2 ...
 $ authscore: num  96 128 83 61 101 82 121 132 135 109 ...

>

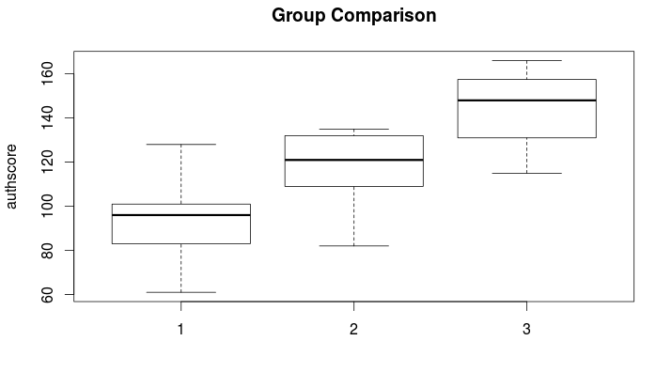
It is often useful to do a visual examination of the ranked means prior to post hoc analysis. This can be easily accomplished using a boxplot to display the 3 groups that are presented in the example. If the data frame created in tutorial one is still in the global environment the boxplot can be generated with the following script:

>#boxplot using authscore and group variables from the data frame created in part one

>boxplot(authscore ~ group, data=kruskal, main=”Group Comparison”, ylab=”authscore”)

>

The resulting boxplot is seen below:

Rplot5

As can be seen in the plot, authority score differences are the greatest between group 1 and 3 with group 2 In between. Use the following code to run the Kruskal-Wallis test and examine if any of the means are significantly different:

#library(PMCMR)

with(kruskal, {

posthoc.kruskal.nemenyi.test(authscore, Group, “Tukey”)

}

The post hoc test used in this example is from the recently released PMCMR R package. For details of this and other post hoc tests contained in the package( see Thorsten Polert, Calculate Pairwise Multiple Comparisons of Mean Rank Sums, 2015. http://cran.r-project.org/web/packages/PMCMR/PMCMR.pdf.) The test employed here used the Tukey method to make pairwise comparisons of the mean rank authoritarianism scores of the three groups. The output from the script above is:

Pairwise comparisons using Tukey and Kramer (Nemenyi) test

with Tukey-Dist approximation for independent samples

data: authscore and Group

      1                    2

2   0.493             –

3    0.031        0.310

P value adjustment method: none

The output above confirms what would be expected from observing the boxplot. The only means that differ significantly are means 1 and 3 with a p = .031.

The PMCMR package will only work with R versions 3.0.x. If using an earlier version of R another package can be used to accomplish the post hoc comparisons. This package is the pgirmess package (see http://cran.r-project.org/web/packages/pgirmess/pgirmess.pdf for complete details). Using the vectors authscore and Group that were created earlier the script for multiple comparison using the pgirmess package is:

library(pgirmess)

authscore <- c(96,128,83,61,101,82,121,132,135,109,115,149,166,147)

Group <- c(1,1,1,1,1,2,2,2,2,2,3,3,3,3)

kruskalmc(authscore ~ Group, probs=.05, cont=NULL)

and the output from this script using a significance level of p = .05 is:

Multiple comparison test after Kruskal-Wallis

p.value: 0.05

Comparisons

      obs.dif    critical.dif     difference

1-2    3.0        6.333875         FALSE

1-3    7.1        6.718089         TRUE

2-3    4.1        6.718089        FALSE

>

As noted earlier the comparison between groups one and three is shown to be the only significant difference at the p=.05 level.

Both the PMCMR and the pgirmess packages are useful in producing post hoc comparisons with the Kruskal-Wallis test. It hoped that the series of tutorials discussing nonparametric alternatives common parametric statistical tests has helped demonstrate the utility of these approaches in statistical analysis.

In part four I will post the complete script used in all three tutorials.
Using R for Nonparametric Statistics: The Kruskal-Wallis Test, Part Two


Using R for Nonparametric Statistics:  The Kruskal-Wallis Test, Part Two

A Tutorial by Douglas M. Wiig

Before we can run the Kruskal-Wallis test we need to define which column contains the factors (independent variables) and which contains the authoritarianism scores (dependent variable). Once we define the factor column R will match the correct score to each of the 14 observations.
As set up in the study, ‘Group’ is the factor(independent variable), and ‘authscore’ is the dependent variable. Use the command:

> Group <-factor(1,2,3)

This designates which observation belongs to each group. To make sure the data structure has been set up correctly use the command:

> str(kruskal)
‘data.frame’: 14 obs. of 2 variables:
$ Group : num 1 1 1 1 1 2 2 2 2 2 …
$ authscore: num 96 128 83 61 101 82 124 132 135 109 …
>

The output of this command shows a summary of the structure of the data frame created. We can now run the Kruskal Wallis test with the command:

> kruskal.test(authscore ~ Group, data=kruskal)

The output will be:

Kruskal-Wallis rank sum test

data: authscore by Group
Kruskal-Wallis chi-squared = 6.4057, df = 2, p-value = 0.04065

>

As seen in the above output the analysis of authoritarianism score by group indicates that the probability of differences in scores among the three groups being due to chance alone is less that the .05 alpha level that was set for the study. (pobt < .05). Further post hoc analysis would be necessary to determine the exact nature of the differences among the scores of the three groups. This will be the topic of a future tutorial.

More to come:  Part Three will explore the use of multiple comparison techniques to analyze ranked means

R Tutorial: A Simple Script to Create and Analyze a Data File, Part Two


A simple R script to create and analyze a data file:part two:    A tutorial by D.M. Wiig

In part one I discussed creating a simple data file containing the height and weight of 10 subjects.  In part two I will discuss the script needed to create a simple scatter diagram of the data and perform a basic Pearson correlation.  Before attempting to continue the script in this tutorial make sure that you have created and save the data file as discussed in part one.

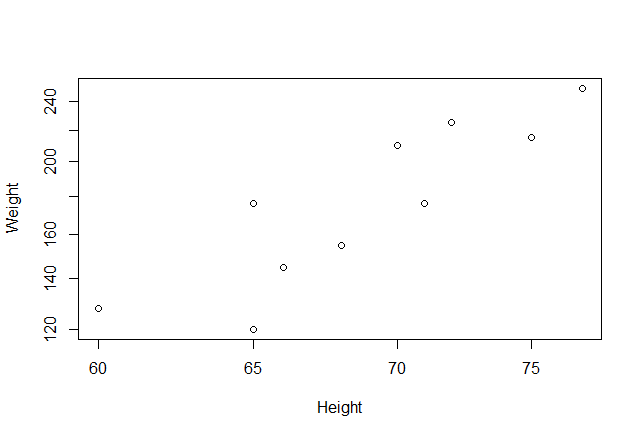
To conduct a correlation/regression analysis of the data we want to first view a simple scatter plot. Load a library named ‘car’ into R memory. Use the command:

> library(car)

Then issue the following command to plot the graph:

> plot(Height~Weight, log=”xy”, data=Sampledatafile)

The output is seen below:

scatter1

We can calculate a Pearson’s Product Moment correlation coefficient by using the command:

> # Pearson rank-order correlations between height and weight

> cor(Sampledatafile[,c(“Height”,”Weight”)], use=”complete.obs”, method=”pearson”)

Which results in:

Height Weight

Height 1.0000000 0.8813799

Weight 0.8813799 1.0000000

To run a simple linear regression for Height and Weight use the following code. Note that the dependent variable (Weight) is listed firt:

> model <-lm(Weight~Height, data=Sampledatafile)

> summary(model)

Call:

lm(formula = Weight ~ Height, data = Sampledatafile)

Residuals:

Min 1Q Median 3Q Max

-30.6800 -16.9749 -0.8774 19.9982 25.3200

Coefficients:

Estimate Std. Error t value Pr(>|t|)

(Intercept) -337.986 98.403 -3.435 0.008893 **

Height 7.518 1.425 5.277 0.000749 ***

Signif. codes: 0 ‘***’ 0.001 ‘**’ 0.01 ‘*’ 0.05 ‘.’ 0.1 ‘ ’ 1

Residual standard error: 21.93 on 8 degrees of freedom

Multiple R-squared: 0.7768, Adjusted R-squared: 0.7489

F-statistic: 27.85 on 1 and 8 DF, p-value: 0.0007489

>

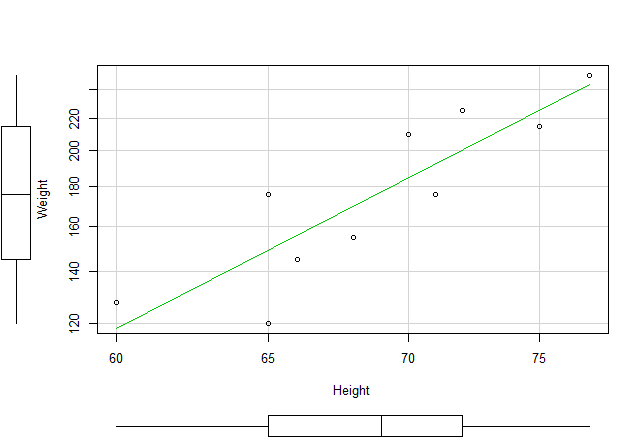
To plot a regression line on the scatter diagram use the following command line. Note that we enter the y (dependent)variable first and then the x (independent)variable:

> scatterplot(Weight~Height, log=”xy”, reg.line=lm, smooth=FALSE, spread=FALSE,

+ data=Sampledatafile)

>

This will produce a graph as seen below. Note that box plots have also been included in the output:

scatter2

This tutorial has hopefully demonstrated that complex tasks can be accomplished with relatively simple command line script. I will explore more of these simple scripts in future tutorials.

More to Come:


Book Review: R High Performance Programming


A book review by Douglas M. Wiig

Aloysius Lim and William Tjhi. R High Performance Programming. Birmingham, UK: Packt Publishing Ltd., 2015. bit.ly/14Rhpp

R High Performance Programming is a well written, informative book most suited for the experienced R programmer. This book offers a handy guide for R users who need speed and efficiency for the tasks that they perform.

The authors begin with an informative chapter discussing some of the inherent constraints on R’s computing performance such as CPU and RAM usage, and how R code is interpreted on the fly rather than compiled. A guide to several methods of profiling R’s code execution time, memory allocation and CPU usage is discussed in the next chapter. Sample code included in the chapter allows the reader to experiment with various benchmarking techniques to measure processing time and memory usage. This chapter provides the reader with some good tools for benchmarking R projects and identifying areas where improvements in processing can be made.

As is always the case with technical books from Packt Publishing, ample code examples are used in the chapter and the complete code used in each chapter is available for download with the book. This is a very handy feature and allows readers to do some live programming with R as the book is read.

The authors discuss a number of simple tweaks that can be easily performed to increase processing speed such as using built in functions and using hash tables. The hash table technique is useful for applications that use frequent lookups and can dramatically reduce processing time when compared to the use of lists. Running example code using this technique shows a large decrease in processing time when using the hash table approach as compared to straight list processing lookups.

In chapter 4 the authors discuss the use of compiled R code and integrating compiled languages into R code. They show several examples of using the R package inline that allows users to embed C, C++, Objective-C, Objective-C++ and Fortran code within R. Once again there are ample code examples to illustrate the use of this technique. For more advanced uses of compiled code the authors discuss how to create entire modules coded in C++ using the Rcpp package. Several completed code examples are included to illustrate the technique.

Another interesting approach to speeding up R is discussed in a chapter that explores several R packages designed to exploit the capability of GPU’s (Graphic Processing Cards) that are a used in many computers. These techniques can facilitate creating very fast and efficient statistical modeling code using R and the GPU.

As indicated above, readers can download the code package included with the book and find a well-organized set of ten folders (one for each chapter) containing 51 files. These files contain the sample code from the book as well as other code segments and benchmark code discussed in the book. The authors indicate that the code has been tested on R 3.1.1, Ubuntu 14.04 Trusty Tahr, Mac OS X 10.9 Mavericks, and Windows 8.1. This allows integration of these code segments into the reader’s own projects with minimal changes.

Other chapters in R High Performance Programming discuss simple tweaks to use less memory, techniques to speed processing of large datasets and using parallel processing and clustering techniques. The last chapter contains a discussion of using R and Hadoop to process Big Data (massive datasets with sizes measured in petabytes -one petabyes is 1,048,576 gigabytes). Processing data of this magnitude presents many challenges and is an area that is currently the subject of much program development.

I found R High Performance Programming to be a useful and informative book for the advanced user of R. A working knowledge of statistics, R and other programming languages such as C++ or Java is necessary to realize the full benefit of the techniques presented in the book. The book also serves as a good learning tool for less knowledgeable R users who are seeking to advance their programming skills.

Readers who are interested in the use of Hadoop and cluster computer processing might find the book Raspberry Pi Super Cluster by Andrew K. Dennis of interest. (Packt Publishing, 2013

PAC-14-1987838-1387169). A review of this book can be found on my web site at http://dmwiig.net.

Reviewer Information:

Douglas M. Wiig, Professor of Political Science

Grand View University

Teaching areas include social science statistics and research methods, comparative politics, international politics.

Long time user and developer of computer and statistical applications

Host of Open Source Technology in Higher Education web site at http://dmwiig.net

Creator and moderator of LinkedIn discussion forum “Open Source Technology in Higher Education”

Regular contributor to several LinkedIn discussion forums

Author of numerous tutorials on using the R statistical programming language and Raspberry Pi computer

R Tutorial: A Script to Create and Analyze a Simple Data File, Part One


R Tutorial: A Simple Script to Create and Analyze a Data File, Part One

By D.M. Wiig

In this tutorial I will walk you through a simple script that will show you how to create a data file and perform some simple statistical procedures on the file. I will break the code into segments and discuss what each segment does. Before starting this tutorial make sure you have a terminal window open and open R from the command line.

The first task is to create a simple data file. Let’s assume that we have some data from 10 individuals measuring each person’s height and weight. The data is shown below:

Height(inches) Weight(lbs)

72               225

60               128

65               176

75               215

66               145

65               120

70               210

71               176

68               155

77               250

We can enter the data into a data matrix by invoking the data editor and entering the values. Please note that the lines of code preceded by a # are comments and are ignored by R:

#Create a new file and invoke the data editor to enter data

#Create the file Sampledatafile, height and weight of 10 s subjects

Sampledatafile <-data.frame()

Sampledatafile <-edit(Sampledatafile)

You will see a window open that is the R Data Editor. Click on the column heading ‘var1’ and you will see several different data types in the drop down menu. Choose the ‘real’ data type. Follow the same procedure to set the data type for the second column. Enter the data pairs in the columns, with height in the first column and weight in the second column. When the data have been entered click on the var1 heading for column 1 and click ‘Change Name.’ Enter ‘Height’ to label the first column. Follow the same steps to rename the second column ‘Weight.’

Once both columns of data have been entered you can click ‘Quit.’ The datafile ‘Sampledatafile’ is now loaded into memory.

To run so me basic descriptive statistics use the following code:

> #Run descriptives on the data

> summary(Sampledatafile)

The output from this code will be:

  Height                Weight

Min. :60.00          Min. :120.0

1st Qu.:65.25        1st Qu.:147.5

Median :69.00        Median :176.0

Mean :68.90          Mean :180.0

3rd Qu.:71.75        3rd Qu.:213.8

Max. :77.00          Max. :250.0

>

To view the data file use the following lines of code:

>#print the datafile ‘Sampledatafile’ on the screen

> print(Sampledatafile)

You will see the output:

Height          Weight

1 72             225

2 60             128

3 65             176

4 75             215

5 66             145

6 65             120

7 70             210

8 71             176

9 68             155

10 77            250

In Part Two I will discuss an R script to do a simple correlation and scatter diagram.  Check back later!

Nonparametric Statistical Analysis Using R: The Sign Test


Using R in Nonparametic Statistical Analysis:  The Binomial Sign Test

A tutorial by D.M. Wiig

One of the core competencies that students master in introductory social science statistics is to create a null and alternative hypothesis pair relative to a research question and to use a statistical test to evaluate and make a decision about rejecting or retaining the null hypothesis.  I have found that one of the easiest statistical tests to use when teaching these concepts is the sign test.  This is a very easy test to use and students seem to intuitively grasp the concepts of trials and binomial outcomes as these are easily related to the common and familiar event of ‘flipping a coin.’


While it is possible to use the sign test by looking up probabilities of outcomes in a table of the binomial distribution I have found that using R to perform the analysis is a good way to get them involved in using statistics software to solve the problem.  R has an easy to use sign test routine that is called with the binom.test command.  To illustrate the use of the test consider an experiment where the researcher has randomly assigned 10 individuals to a group and observes them in both a control and experimental condition.  The researcher measures the criterion variable of interest in each condition for each subject and measures the effect on each subject’s behavior using a relative scale of effect.


The researcher at this point is only interested in whether or not the criterion variable has an effect on behavior, so a non-directional hypothesis is used.  The data collected is shown in the following table:


Subject   1     2     3     4     5     6      7      8     9     10

———————————————————————-

Pre      50   49   37   16   80   42    40    58   31    21

Post.   56   50   30   25   90   44    60    71   32    22

———————————————————————–

+     +     –     +     +     +      +      +    +      –

The general format for the sign test is as follows:


binom.test(x, n, p =.5, alternative = “two.sided”, “less”, “greater”, conf.level = .95)


where: x = number of successes

n = number of trials

alternative = indicates the alternative hypthesis as directional or nondirectional

conf.level = the confidence level for the returned confidence interval.


In the example as described above we have 8 pluses and 2 minuses.  We will use the “two.sided” option for the alternative hypothesis a probability of success of .50, and a conf.level of .95. The following is entered into R:

Under a nondirectional alternative hypothesis we are testing the probability of obtaining 0, 1, 2, 8, 9, 10 pluses or:

> binom.test(8, 10, p=.5, alternative=”two.sided”, conf.level=.95)

Exact binomial test

data:  8 and 10
number of successes = 8, number of trials = 10,
p-value = 0.1094
alternative hypothesis: true probability of success is not equal to 0.5
95 percent confidence interval:
0.4439045 0.9747893
sample estimates:
probability of success
                  0.8
>

Under a nondirectional alternative hypothesis we are testing the probability of obtaining 0, 1, 2, 8, 9, 10 pluses or:


p(o, 1, 2, 8, 9, 10 pluses)  = .1094


If we had set an alpha of ά=.05 then we would retain the null hypothesis as p(obt) > .05.  We could not conclude that the experimental criterion has an effect on behavior.  R has many other nonparametric statistical tests that are easy to use from the command line.  These are topics for future tutorials.


More to Follow:

Using R for Basic Cross Tabulation Analysis: Part Three, Using the xtabs Function


Using R to Work with GSS Survey Data Part Three: Using xtabs to Create and Analyze Tables

A tutorial by D. M. Wiig
In Part Two of this series of tutorials I discussed how to find and import a data set from the NORC GSS survey. The focus of that tutorial was on the GSS2010 data set that was imported into the R workspace in SPSS format and then loaded into an R data frame for analysis.

Use the following code to load the data set into an R workspace:

>install.packages(“Hmisc”) #need for file import
>install.packages(“foreign”) #need for file import
>#get spss gss file and put into data frame
>library(Hmisc)
>gssdataframe <- spss.get(“/path-to-your-file/GSS2010.sav”, use.value.labels=TRUE)

The xtabs function provides a quick way to generate and view a cross tabulation of two variables and allows the user to specify one or more control variables in the cross tabulation. Using the variables “ partyid” and “polviews” the cross tablulation is generated with:

>#use xtabs to produce a table
>gsstab <- xtabs(~ partyid + polviews, data=gssdataframe)

To view the resulting table use:

>gsstab #show table

To view summary statistics generated use:

summary(gsstab)

This summary shows the number of cases in the table, the number of factors and the Chi-square value for the table.

Variables used in social science research are often interrelated so it is desirable to control for one or more variables in order to further examine the variables of interest. The table created in the gsstab data frame shows the relationship between political ideology and political party affiliation. To look at the relationship by gender use the following:

>#use xtabs to produce a table with a control variable
>gsstab2 <- xtabs(~ partyid + polviews+ sex, data=gssdataframe)

To view the new table use:

>gsstab2

To view summary statistics for the table enter:

>summary(gsstab2)

As noted above xtabs is a quick and powerful function to create N x N tables with or without control variables. In the next tutorial I explore the use of the ca function to produce a basic Correspondence analysis of underlying dimensions in an N x N table.

Using R to Work with GSS Survey Data: Cross Tabulation Tables


Using R to Work with GSS Survey Data: Viewing Datasets and Performing Cross Tabulations

A tutorial by D. M. Wiig

In a previous tutorial I discussed how to import datasets from the NORC General Social Science Survey using R to write the SPSS formatted data to an R data frame. Once the data has been imported into the R working environment it can be viewed and analyzed. There is a wealth of survey research data available at the NORC web site located at www.norc.org. In this tutorial the dataset gss2010.sav will be used. The dataset is available from www3.norc.org/GSS+Website.

From that page click on the “Quick Downloads” link on the right hand side of the page to access the list of available datasets. From the next page choose SPSS to access ‘.sav’ format files and finally “2010” under the heading “GSS 1972-2012 Release 6.” Please note that this is a rather large data file with 2044 observations of 794 variables. Download the file to a directory that you can access from your R console.

As discussed in a previous tutorial the SPSS format file can be loaded into an R data frame. Make sure that the R packages Hmisc and foreign have been installed and loaded before attempting to import the SPSS file. The following code will load the ‘.sav’ file:

>install.packages(“Hmisc”) #need for file import

>install.packages(“foreign”) #need for file import

>#get spss gss file and put into data frame

>library(Hmisc)

>gssdataframe <- spss.get(“/path-to-your-file/GSS2010.sav”, use.value.labels=TRUE)

Once the file is read into an R data frame it can be viewed in a spreadsheet like interface by using the command:

>View(gssdataframe)

Using the arrow keys, the home key, end key, and the page up and page down keys allows navigating and browsing the file.

Survey data such as that found in the GSS file is usually a mixture of data types ranging from ratio level numbers to categorical data. Cross tabulations are often used to explore relationships among variables that are ordinal or categorical in nature. R has a number of functions available for cross tabulations. The Table function is a quick way to generate a cross tabulation table with a number of options available. The following results in a frequency table of the variables “partyid” and “polviews” both of which are measured in categories:

>#use the gssdataframe

>#the variables partyid and polviews are used

>attach(gssdataframe)

>#create a table named ‘gsstable’

>gsstable <- table(partyid, polviews)

>gsstable #print table frequencies

The following output results:

                   polviews
partyid              EXTREMELY LIBERAL LIBERAL SLIGHTLY LIBERAL MODERATE
  STRONG DEMOCRAT                   41     105               42       94
  NOT STR DEMOCRAT                  14      62               57      154
  IND,NEAR DEM                      11      47               57      103
  INDEPENDENT                        5      20               33      189
  IND,NEAR REP                       1       4               16       74
  NOT STR REPUBLICAN                 2      10               16       88
  STRONG REPUBLICAN                  0       5                5       22
  OTHER PARTY                        1       5                6       16
                    polviews
partyid              SLGHTLY CONSERVATIVE CONSERVATIVE EXTRMLY CONSERVATIVE
  STRONG DEMOCRAT                      22           25                    6
  NOT STR DEMOCRAT                     28           16                    7
  IND,NEAR DEM                         25           11                    5
  INDEPENDENT                          43           32                    9
  IND,NEAR REP                         49           43                    8
  NOT STR REPUBLICAN                   72           72                   13
  STRONG REPUBLICAN                    23          101                   27
  OTHER PARTY                           3           12                    4

>

There are options available with the Table function that include calculating row and column marginal totals as well a cell percentages. Another quick method to generate tables is with the CrossTable function. The function is contained in the gmodels package and can be used on the table generated with the Table function above. Use the following lines of code to generate a cross table between ‘polviews’ and ‘partyid’ using the gsstable created above:

>library(gmodels)

>#produce basic crosstabs

>CrossTable(gsstable,prop.t=FALSE,prop.r=FALSE,prop.c=FALSE,chisq=TRUE,format=c(“SPSS”))

>

Cell Contents
|-------------------------|
|                   Count |
| Chi-square contribution |
|-------------------------|

Total Observations in Table:  1961 

                   | polviews 
           partyid |    EXTREMELY LIBERAL  |              LIBERAL  |     SLIGHTLY LIBERAL  |             MODERATE  | SLGHTLY CONSERVATIVE  |         CONSERVATIVE  | EXTRMLY CONSERVATIVE  |            Row Total | 
-------------------|----------------------|----------------------|----------------------|----------------------|----------------------|----------------------|----------------------|----------------------|
   STRONG DEMOCRAT |                  41  |                 105  |                  42  |                  94  |                  22  |                  25  |                   6  |                 335  | 
                   |              62.014  |              84.219  |               0.141  |               8.312  |              11.962  |              15.026  |               4.163  |                      | 
-------------------|----------------------|----------------------|----------------------|----------------------|----------------------|----------------------|----------------------|----------------------|
  NOT STR DEMOCRAT |                  14  |                  62  |                  57  |                 154  |                  28  |                  16  |                   7  |                 338  | 
                   |               0.089  |               6.911  |               7.238  |               5.486  |               6.840  |              26.537  |               3.215  |                      | 
-------------------|----------------------|----------------------|----------------------|----------------------|----------------------|----------------------|----------------------|----------------------|
      IND,NEAR DEM |                  11  |                  47  |                  57  |                 103  |                  25  |                  11  |                   5  |                 259  | 
                   |               0.121  |               4.902  |              22.674  |               0.284  |               2.857  |              22.144  |               2.830  |                      | 
-------------------|----------------------|----------------------|----------------------|----------------------|----------------------|----------------------|----------------------|----------------------|
       INDEPENDENT |                   5  |                  20  |                  33  |                 189  |                  43  |                  32  |                   9  |                 331  | 
                   |               4.634  |              12.733  |               0.969  |              32.889  |               0.067  |               8.107  |               1.409  |                      | 
-------------------|----------------------|----------------------|----------------------|----------------------|----------------------|----------------------|----------------------|----------------------|
      IND,NEAR REP |                   1  |                   4  |                  16  |                  74  |                  49  |                  43  |                   8  |                 195  | 
                   |               5.592  |              18.279  |               2.167  |               0.002  |              19.466  |               4.622  |               0.003  |                      | 
-------------------|----------------------|----------------------|----------------------|----------------------|----------------------|----------------------|----------------------|----------------------|
NOT STR REPUBLICAN |                   2  |                  10  |                  16  |                  88  |                  72  |                  72  |                  13  |                 273  | 
                   |               6.824  |              18.702  |               8.224  |               2.190  |              33.411  |              18.786  |               0.364  |                      | 
-------------------|----------------------|----------------------|----------------------|----------------------|----------------------|----------------------|----------------------|----------------------|
 STRONG REPUBLICAN |                   0  |                   5  |                   5  |                  22  |                  23  |                 101  |                  27  |                 183  | 
                   |               6.999  |              15.115  |              12.805  |              32.065  |               0.121  |             177.476  |              52.256  |                      | 
-------------------|----------------------|----------------------|----------------------|----------------------|----------------------|----------------------|----------------------|----------------------|
       OTHER PARTY |                   1  |                   5  |                   6  |                  16  |                   3  |                  12  |                   4  |                  47  | 
                   |               0.354  |               0.227  |               0.035  |               0.170  |               1.768  |               2.735  |               2.344  |                      | 
-------------------|----------------------|----------------------|----------------------|----------------------|----------------------|----------------------|----------------------|----------------------|
      Column Total |                  75  |                 258  |                 232  |                 740  |                 265  |                 312  |                  79  |                1961  | 
-------------------|----------------------|----------------------|----------------------|----------------------|----------------------|----------------------|----------------------|----------------------|

 
Statistics for All Table Factors


Pearson's Chi-squared test 
------------------------------------------------------------
Chi^2 =  801.8746     d.f. =  42     p =  3.738705e-141 


       Minimum expected frequency: 1.797552 
Cells with Expected Frequency < 5: 2 of 56 (3.571429%)

Warning message:
In chisq.test(t, correct = FALSE, ...) :
  Chi-squared approximation may be incorrect

>

This code produces a table of frequencies along with a basic Ch-squared test. Other options include generating cell percentages and using either SPSS or SAS table format. This is accomplished by changing the appropriate flag from FALSE to TRUE and specifying either SPSS or SAS for the format flag. The table formatting is compressed in this example due to the narrow margin requirements of the web page.  Use the scroll bar at the bottom of the page to view the entire table.

There are many functions available in R to analyze data in tabular format. In my next tutorial I will examine using the xtabs function to produce basic cross tabulation with control variables.

R Tutorial: Using R to Work With Datasets From the NORC General Social Science Survey


R Tutorial: Using R to Work With Datasets From the NORC General Social Science Survey

A tutorial by D. M. Wiig

Part One:

When I teach classes in social science statistics and social science research methods I like to use “live” data as much as possible both in classroom lectures and in homework assignments. For the social sciences one excellent and readily available source of live data is the ongoing General Social Science Survey project, The National Data Program for the Sciences. This is a project of NORC, a National Science Research Center at the University of Chicago (see www.norc.org for the projects main web site.)

There a a number of datasets available in different formats. The quick download datasets that I like to use are primarily SPSS data files. Many institutions have SPSS available for students and faculty but the use of SPSS is my no means universal. I have found that it is easy to use R to read the .sav format files into an R data frame and then write the file out to a comma separated value, .csv format that can be read my almost any statistics software package. As I will discuss in this an future tutorials it is also quite effective to use R to analyze the GSS files.

To create R datasets using the GSS files we can use some of the file import/export features available in R. To begin, make sure that the R packages “Hmisc” and “foreign” are installed and loaded in your R session environment. This can be accomplished using:

> install.packages(“Hmisc”) #need for file import

> install.packages(“foreign”) #need for file import

As an example, the following code will load the GSS data file “gss2010x.sav” into an R data frame using the spss.get function:

>library(Hmisc)

>gssdataframe <- spss.get(“/path-to-your-file/gss2010x.sav”, use.value.labels=TRUE)

The file “gss2010x.sav” contains 500 observations of 47 variables. Codebooks and other information about the data in these datasets is readily avaiable for download from the NORC web site. After the data is loaded into the data frame it can be viewed using:

>gssdataframe

To convert and save the file to a comma separated value (.csv) format use the following use the write.table function:

>#write dataframe to .csv file

>write.table(gssdataframe, “/path-to-your-file/gss2010x.csv”,sep=”,”)

The file, now in a .csv format can be accessed with virtually any statistics package or other software. In my next tutorial I will discuss working with GSS data using the various table and cross table functions available in R.


Using R for Nonparametric Statistical Analysis: Nonparametric Correlation


Using R for Nonparametric Statistical Analysis: Nonparametric Correlation

A Tutorial by D.M. Wiig

In previous tutorials I discussed how the download and install R on a Linux Debian operating system and how to use R to perform Kendall’s Concordance analysis. This tutorial explores some basic R commands to open a built-in dataset, produce a simple scatter plot of the data and perform a nonparametric correlation using Kendall’s and Spearman’s rank order correlations. Before beginning this tutorial open a terminal window and start R.


One of the packages t hat is downloaded with the R distribution is called “datasets.” One of the files in the dataset, USJudgeRatings, contains a data frame that measures lawyer’s rating of 43 state judges on 12 numeric variables. Since the scale used in these ratings is ordinal it is appropriate to use rank order correlation to analyze the data. To examine the data in the USJudgeRatings file use the command sequence:


> data(USJudgeRatings, package=”datasets”)

	> print(USJudgeRatings)

                CONT INTG DMNR DILG CFMG DECI PREP FAMI ORAL WRIT PHYS RTEN
AARONSON,L.H.    5.7  7.9  7.7  7.3  7.1  7.4  7.1  7.1  7.1  7.0  8.3  7.8
ALEXANDER,J.M.   6.8  8.9  8.8  8.5  7.8  8.1  8.0  8.0  7.8  7.9  8.5  8.7
ARMENTANO,A.J.   7.2  8.1  7.8  7.8  7.5  7.6  7.5  7.5  7.3  7.4  7.9  7.8
BERDON,R.I.      6.8  8.8  8.5  8.8  8.3  8.5  8.7  8.7  8.4  8.5  8.8  8.7
BRACKEN,J.J.     7.3  6.4  4.3  6.5  6.0  6.2  5.7  5.7  5.1  5.3  5.5  4.8
BURNS,E.B.       6.2  8.8  8.7  8.5  7.9  8.0  8.1  8.0  8.0  8.0  8.6  8.6
CALLAHAN,R.J.   10.6  9.0  8.9  8.7  8.5  8.5  8.5  8.5  8.6  8.4  9.1  9.0

……………


You will see all 43 cases in the output. To save space here I have just shown a portion of the output. Please note that file names in R are case sensitive so be sure to use capital letters where shown.

The basic R distribution has fairly extensive graphing capabilities. To produce

a simple scatter diagram of the variables PHYS and RTEN that graphs RTEN on the

X axis and PHYS on the Y axis use the following line of code:


	> plot(PHYS~RTEN, log="xy", data=USJudgeRatings)


You should see a scatter plot similar to the one below: (yours will be larger, I reduced this to save space)


                         Scatter plot did not show in this html markup 


We can perform a correlation analysis on the data using either Kendall’s rank order correlation or Spearman’s Rho. For a Kendall correlation make sure the file USJudgeRatings is loaded into memory by using the command:


>data(USJudgeRatings, package=”datasets”)


Now perform the analysis with the command:

> cor(USJudgeRatings[,c(“PHYS”,”RTEN”)], use=”complete.obs”, method=”kendall”)


   	       PHYS      RTEN
	PHYS 1.0000000 0.7659126
	RTEN 0.7659126 1.0000000


As seen above we specify the two variable we want to correlate and indicate that all oberservations are to be used. Running a Spearman’s on the same variables is a matter of changing the “method =” designator:


> cor(USJudgeRatings[,c(“PHYS”,”RTEN”)], use=”complete.obs”, method=”spearman”)


             PHYS      RTEN
	PHYS 1.0000000 0.9031373
	RTEN 0.9031373 1.0000000


To produce a kendall’s correlation matrix of all 12 of the variables use:


> cor(USJudgeRatings[,c("CONT","INTG","DMNR","DILG","CFMG", "DECI",
+                       "ORAL","WRIT","PHYS","RTEN")], use="complete.obs", method="kendall")
             CONT       INTG       DMNR         DILG       CFMG       DECI
CONT  1.000000000 -0.1203440 -0.1162402 -0.001142206 0.09409104 0.05498285
INTG -0.120344017  1.0000000  0.8607446  0.689935415 0.60919580 0.64371783
DMNR -0.116240241  0.8607446  1.0000000  0.662117755 0.60801429 0.63320857
DILG -0.001142206  0.6899354  0.6621178  1.000000000 0.86484298 0.89194190
CFMG  0.094091035  0.6091958  0.6080143  0.864842984 1.00000000 0.91212083
DECI  0.054982854  0.6437178  0.6332086  0.891941895 0.91212083 1.00000000
ORAL -0.027381743  0.7451506  0.7272732  0.859909442 0.82495629 0.83952698
WRIT -0.028474100  0.7187820  0.6942712  0.877775007 0.83497447 0.85064096
PHYS -0.066667371  0.6309756  0.6296740  0.752740177 0.72853135 0.77215650
RTEN -0.021652594  0.8013829  0.7979569  0.822527726 0.76344652 0.80206419
            ORAL       WRIT        PHYS        RTEN
CONT -0.02738174 -0.0284741 -0.06666737 -0.02165259
INTG  0.74515064  0.7187820  0.63097556  0.80138292
DMNR  0.72727320  0.6942712  0.62967404  0.79795687
DILG  0.85990944  0.8777750  0.75274018  0.82252773
CFMG  0.82495629  0.8349745  0.72853135  0.76344652
DECI  0.83952698  0.8506410  0.77215650  0.80206419
ORAL  1.00000000  0.9596834  0.79429138  0.90227331
WRIT  0.95968339  1.0000000  0.77463199  0.85309146
PHYS  0.79429138  0.7746320  1.00000000  0.76591261
RTEN  0.90227331  0.8530915  0.76591261  1.00000000

>


If the data you are using is measured at the interval or ratio level just change the “method=” designator to “Pearson” to produce a product-moment correlation.


More to Come: